Pages

Sunday, December 25, 2016

Glamper Greetings Merry Christmas

Merry Christmas to everyone!!  I hope your Holiday is filled with lots of love, happiness, fun and good health!

I made this Christmas card especially for my cousin who likes to go camping.  Usually they tent camp or rent a cabin when they go.  At one time her Mom and Dad owned a camper and were members of the Good Sam's club (I think that is what it is called).  Years ago we owned a camper similar too this one and would go camping at a near by lake with my parents and our daughters, lots of fun!!


I should have done this scene a little bit different but for my first try it came out pretty good.  When I did the grass, I put "frost" on it with my glue pen and sprinkle on some Dazzling Diamonds for some sparkle.

Here is the recipe:
Stamp set: Glamper Greetings
Card stock: Pool Party, Blushing Bride and Whisper White
Various Stampin' Write markers
Blender pen
Sponges
Black Memento ink

Have a GREAT day!!  Mary

Saturday, December 24, 2016

Father Christmas

Well when I was thinking about this card, it turned out so much prettier in my mind, sigh.  After I got done embossing it with the gold embossing powder, I realized it was really too detailed for this type of technique, but I went ahead and used the card anyway.  Next time I will try the new Watercolor Pencils on this stamp image, as the stamp set is being carried forward!


Here is the recipe:
Stamp set: Father Christmas
Card stock: Cherry Cobbler
Gold Foil Sheet
Gold Embossing Powder

Pretty simple, if you could see it better, sigh.  If you click on the picture, it will enlarge the photo for you.

Happy Christmas Eve!!  Mary

Friday, December 23, 2016

Christmas Thank You Cards

My daughter requested some Christmas thank you cards for the day care staff where her little boy attends.  So I made some of these cards for her.  Since she only needed three, I made them a little bit more fancy for the teachers.


I hope she liked them and the teachers too.  Here is what I used:

Card stock: Thick Whisper White, Cherry Cobbler, Always Artichoke, Crumb Cake and Soft Suede
Stamp: Watercolor Thank You-retired
Pretty Pines Thinlits
Ink: Versa Mark
Gold Embossing Powder
Gold Glimmer Paper
Paper Doily-retired
Garden Green Baker's Twine

I like how it turned out and with the use of the thinlits, not to hard to make either.

Hope you have a great day.  Mary


Thursday, December 22, 2016

Jolly Friends

Hello again to my blogging friends!  I'm going to share with you the last of my Christmas cards for the reminder of the week.  Yes, I know it is too late to make them, but there is always next year too!

Now this card is from a PDF that quite a few demonstrators have been sharing the last couple of weeks, so as far as who made it originally is anyones guess.  I believe some of the demonstrators belong to a co-op where they share card tutorials from, lucky us!


Isn't this moose just the cutest!  He also is very cute with the Jolly Hat on his head too.

Here is what was used:
Card stock: Basic Black, Crumb Cake, Sahara Sand and Real Red
Ink: Soft Suede
Crumb Cake marker
Stamp set: Jolly Friends and Snow Place-sentiment
Star Framelits
Gold Metallic Thread
Dimensonials

Thank you for taking time out of your busy schedule to stop by, I appreciate it!  Mary

Wednesday, December 21, 2016

Ugly Sweater

Well my intent for this card was for it to be a ugly sweater card, but when I was finished making it, it was too cute to be ugly!  This is not my original design, I got a PDF for it somewhere, but don't remember where now.  I used the new Cable Knit Dynamic Textured Impressions Embossing Folder, wow that is a mouth full to say!!  When you use the new Dynamic Textured folders you only use a top clear plate with it, otherwise it is too thick to go through your Big Shot.  It creates really deep texture and adds a lot of dimension to the card stock.


For this card I used the following:

Card stock: Cherry Cobbler, Crumb Cake and Emerald Envy
Ink: Soft Suede
Soft Suede marker
Dazzling Diamond and Red Glimmer paper
Punches: Cookie Cutter Builder and Jolly Hat Builder
Warmth & Cheer DSP
Circle Framelit-for the neckline of the shirt
Crimper-retired

I hope you like my "ugly sweater" and if you have this embossing folder, please share your creation with me, would like to see it!!  Thanks,   Mary


Monday, December 19, 2016

Merry Medley

Well, so sorry that I've been missing for so long, didn't realize it had been 2 weeks already!!  Like all of you I've been busy getting ready for Christmas and finally, I think, I'm ready!

Today I'm sharing another card made with the background stamp called Merry Medley.  Did you know you can cut this stamp apart and have 10 different stamps!!


For my card I used the following:

Stamp set: Merry Medley
Ink: Craft Whisper White
Card Stock: Thick Whisper White, Cherry Cobbler, Basic Black, Old Olive, Marina Mist and Daffodil Delight
Thinlits: Pyramid Pals (for the light bulbs) and Pretty Pines
Cherry Cobbler Baker's Twine

Thank you for stopping by to see me, now off to blog some more cards!  Mary


Wednesday, November 30, 2016

Christmas Tags

Today I want to share with you some quick and easy Christmas Tags that I made for my daughter.  She is learning how to can and made some jelly and salsa this past summer for Christmas to share with her friends.  Her Peach Jelly is very good!!

For my tags I use the current Scalloped Tag Topper and one that was retired too.  I used Crumb Cake card stock and cut each piece just 1/16 shy of 2" x 3-1/8".  Now these tags are on the short side because she has small canning jars that they will go on, but you can cut them to whatever length you need.

I use Washi Tape for the bottom decoration and on some used a corner rounder to round the edges.  The little holly and berries is from the Christmas Pines stamp set.  I have used that little stamp quite a bit on the insides of my cards for Christmas this year!  The To/From is from the Here's to Cheers stamp set.  Both stamp sets are in the Holiday Catalog 2016.  To get a closer view, just click on the picture.


Thank you for coming to see me today, come back Friday and I will have some more!  Mary


Monday, November 28, 2016

Cookie Cutter Fall Wreath

Good day to all of you!  Have you recovered from eating way to much turkey on Thursday?  All of our left-overs are gone, so now we can try to get back to eating like normal people, I hope! :)

I made this cute little wreath for my Dad's door at the Assisted Living facility where he lives, I like how it came out and was pretty easy to make.

I used some of the retired Burlap ribbon that Stampin' Up! sold a couple catalogs ago, I really like it and it is/was easy to work with.  I stamped the little Scarecrow from the Cookie Cutter Halloween set and colored the little guy in.  Then I used some retired Framelits to make my smaller leaves with, I cut them out of the brown paper packing that some companies still use.  I then inked them up in different colors to make them look like real leaves.

The wreath form I used was 10 inches and I found it at Jo-Ann's.  Now I need to make one that is a Christmas one for next month.


For the hanger I used the current 5/8" Burlap Ribbon and also the Gold Metallic Thread.

It is not a big wreath, but I didn't want a huge one either.

Thank you for coming by to see me, I appreciate it!  Mary


Thursday, November 17, 2016

Online Extravaganza Starts November 21st

It's that time of year again over at Stampin' Up!  Online Extravaganza!!

You can view the list HERE

Here are some of what will offered on the 21st, remember one day only, while supplies last on these.


Here are some of what will be offered on the 28th, remember one day only, while supplies last.


Wednesday, November 9, 2016

Christmas Trees

Good Wednesday morning.  I hope you all got some sleep last night.  I went to bed at my usual time, didn't stay up to see who won the Presidential race.  I hope you all voted yesterday too!  Now maybe life can get back to normal now??

Today I'm sharing with you a card that I found on Pinterest and have wanted to make for a long time. I decided, this was going to be the year, lol!  When making it, I did find out it there was more work to it then what I thought, but, that could be that I made/punched enough items to make six cards with!


I combined retired items with new items, trying to use up some of my Designer Series stash, do any of you have that same problem?  Once I got all of the trees and stars punched out, it was pretty easy to assemble the card.

Stamp sets-Holly Berry Happiness and Pennant Parade (retired)
Card stock-Real Red and Whisper White
Designer Series Paper-Season of Style (retired)
Ink-Real Red and Early Espresso
Embossing Folder-Softly Falling
Baker's Twine-Candy Cane Lane
Red and Silver Glimmer paper
Gold Dazzling Details

Thank you for stopping by, I appreciate it!  Mary

Monday, November 7, 2016

Vintage Leaves

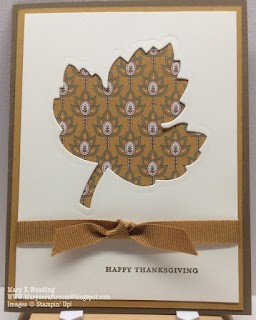
Good Monday morning!  I had a wonderful Saturday downtown at the Convention Center (Bartle Hall) here in Kansas City OnStage that was put on by Stampin' Up!.  What a wonderful company that I work for, they treat their demonstrators so well at these events!!  We got a sneak peek of the new Occasions Catalog that will be coming your way in January 2017 and also the new Sale-A-Brations too, lots of good stuff coming soon!!

Today I'm going to share a quick and easy Thanksgiving card with all of you.  This is a card that I case'd from a fellow demo, Diane.  This is a card that I will use to teach a new beginner stamper the basics of stamping.


For this card I used the following:
Stamp set-Teeny Tiny Wishes
Card stock- Soft Suede, Delightful Dijon and Very Vanilla
Designer Series Paper-Petals & Paisleys
Ribbon-Delightful Dijon which is now available in the Holiday Catalog 2016
Vintage Leaves Framelits

Thank you for stopping in, glad to see you here!  Mary

Friday, November 4, 2016

Belated Halloween Card

Well better late than not at all!  Things have been pretty sad at my house the last 10 days.  We had to send our little girl, Abby, our black Cocker Spaniel across the Rainbow Bridge last Wednesday.  Our little girl had a very fast growing cancer and it had spread to her liver before we found it.  We made her last two months as happy and comfortable as we could.  Our little watch dog is gone and it is so quite in the house now.  We miss her so much.

Now for my quick card share today.  A fellow demonstrator shared this card on a Facebook site and knew it would be perfect for my little grandson.  Thank you Bonnie O'Neil for sharing your cute card!!

I used Pumpkin Pie, Daffodil Delight, Whisper White and Basic Black card stock.  Also some of the new Pumpkin Pie Glimmer paper.  The background is embossed with the Brick Wall embossing folder and I used Halloween Night Baker's Twine.  The nose is made with the smallest scallop Framelit.  I'm sorry but I don't remember the size of the circle punches.

Sorry for my being gone for awhile, hope to be back on a regular schedule next week!!  Mary

Tuesday, October 25, 2016

Stitched Shapes Framelits


Starting on November 1, 2016 the new Stitched Framelits will be available for purchase.  These framelits will we offered in the new Annual Catalog 2017-2018, but Stampin' Up! is offering them early to their demonstrators and customers!  

Also available, are a few stamp set at 25% off, from November 1- 30, 2016.

Friday, October 21, 2016

Santa's Sleigh

I'm friends with a fellow Stampin' Up! demonstrator who lives about 20 minutes from me.  We are going to go to OnStage Kansas City on November 5th together.  I meet her one year in St. Louis at a Regional event, just walked up to her table and asked if I could sit with her and some of her friends and once we got to talking found out that she lived really close to me!  Love how you can go to any SU event and make new friends!!

Anyway, she posted this card on her personal Facebook page, she used current products for her, but I'm showing you mine with retired products from the All is Calm that was offered two years ago!  Yes, I have products that really needs to be used up!!  Gloria's was done in red and mine is done in blue.


You really could use just about any color of Washi tape you have.  The deer is cut using the new Santa's Sleigh Thinlits using the Dazzling Diamonds Glitter paper and the sentiment I used is from Holly Berry Happiness stamp set.  I did use Pool Party with my Gorgeous Grunge splatter stamp first, then applied the Washi tape over that.  The sequins are Bermuda Bay.  I used the Banner punch to make the banner with.  I will make another one but this time I want to try using Smoky Slate card stock for the reindeer to see how that will look too.  I used Thick Whisper White for the card base and then regular Whisper White for the card front.

I hope I have given you some ideas for your Christmas cards too.  Mary

Wednesday, October 19, 2016

Merry Medley

Today I want to share with you some Christmas cards that I've been working on for the last week, using the same stamp set but trying to come up with some different ways to make them.

I choose the Merry Medley background stamp set this time.  After seeing one that Frances Martin made, I wanted to try my ideas out.  Frances did use the Background stamp with her's but I decided to try my cards without, but you could easily use it too with this set!

For the first one I did this:


I wanted to make it look like a present with the 3/8" Silky Taffeta ribbon tied off on the side.  I also added some holly and berries from the Holly Berry Happiness stamp set and used the coordinating punch to punch them out with.

For the next one I did this:


For this one I used the Pretty Pines Thinlits to add some greenery to the front along with with Linen Thread.

For the last one, this is what I did:


For this one I wanted to highlight one of the greetings on the background.  It is hard to see, but I did use some of the Real Red Metallic Thread behind the little panel.  Once again I use the Holly Berry Happiness set and punch.  Oh, on this one I used White Embossing to make the lettering stand out more too.

Card stock I used was Thick Whisper White for the card base, then Cherry Cobbler and then Basic Black.  Ink was Craft Whisper White.

I hope you enjoyed the different versions that I made to share with you!  Mary

Monday, October 17, 2016

Happy Fall

Hi everyone, I hope your week is off to a great start.  Mine is, if the wind doesn't blow us away today!!  It is very windy here, so that means the leaves will be covering the yard and the raking will begin :).

I got to play all day Sunday in the craft room and came up with some cute cards to share with all of you.  This one was inspired by Erica Cerwin, she used her's for a baby card but I used it for fall instead.

I used the Cookie Cutter Halloween set and some watercolor paper, and Aqua Painter to color in my cute little scarecrow.  I like to color so, this is fun for me to do!


I used the Labeler Alphabet set to make the greeting with.  I also used Gorgeous Grunge for the background.  Inks used where: Stazon Black, Crumb Cake, Dapper Denim, Pumpkin Pie, Crushed Curry, Soft Suede and Real Red.  Card stock is Very Vanilla, along with the DSP Petals & Paisleys with a thin strip of the Pumpkin Pie Glimmer Paper.  I used Linen Thread to finish it off with.

This is a thank you card that I will send out as a Thank You for any Online orders I receive.

Thank you for coming by, see you again soon!


Wednesday, October 5, 2016

Cable Knit Sweater Card

Hello, hello.  Once again I'm going to showcase the Cable Knit embossing folder.

If you go to Pinterest, you will find all kinds of cards using this embossing folder and they are making them into "Ugly Sweater" cards!!  I'm going to be offering a local class to people and let them design their own ugly sweater cards, sounds like a lot of fun!!  Heck, a whole class on making sweaters would be great, think guy cards too.

Now the vision I had for this card was different, but I think I saved it so that I can mail it off to someone.  Kind of reminds me of a "Grandma Sweater" too.

I used once again the Pink Flamingo card stock for this card.  I did use half of a retired Paper Doily but the new ones will look great too!  I also used some of my bigger retired pearls for the buttons.  I did mount the card front onto some Blushing Bride card stock to make it look like flesh.


Next time I would make the Cable Knit the same size as the card base, but for my first try, it's not too bad!

Don't forget that selected Designer Series Paper is now buy three and get one free until October 31, 2016!

Hope to see you again soon, and thank you for coming by!  Mary


Monday, October 3, 2016

Cable Knit Embossing Folder Christmas Card

Good Monday afternoon to all of you.  I'm kinda of slow with the post today, had a rough week-end and just trying to re-coup from it.

I saw a card over on Linda Dalke blog using this embossing folder and Pink Flamingo card stock.  It goes really well with Rich Razzleberry and Crumb Cake too.  I decided to make it into a Christmas card.  I lightly sponged the embossing with some Pink Flamingo ink to highlight that more.

I used one of the Metallic Foil Doilies and some Gold Metallic Thread behind my sentiment, which comes from the stamp set Holly Berry Happiness.  I sprinkle around a few Gold Sequins too.


I really like this color combination, it is so pretty in person!

Thank you for stopping by!  Mary


Sunday, October 2, 2016

Cookie Cutter Christmas Part Three

Today I will share the final card that I made with the Cookie Cutter Christmas set.


I used my blender pen to color the little Eskimo in with some Crumb Cake ink.  You can't see it in this picture, but I used the Wink of Stella to add some simmer to the fur part of the parka.  I also used Night of Navy ink and card stock, along with some Linen Thread and the Candy Cane Lane Designer Series paper.  Oh did you know that the whole month of October Stampin' Up! has a great deal on DSP, buy three packages and receive one free, great way to stock up!!  

Thank you for coming to see my creation this week, I appreciate you coming by!!  Mary

Saturday, October 1, 2016

Designer Series Paper Sale

Once again Stampin' Up! is offering their annual Designer Series Paper promotion!  It is a great time to stock up on all of your favorites.  You can choose from the selected Designer Series Paper packs that are listed below.  If you find some Designer Series Paper that you would like to order, I would appreciate your order!  You can order it HERE.  Thank you for your business, I've got a goal this year, I would like to earn the Alaskan Trip that demonstrators can earn this year!


  • Promotion period: October 1–31, 2016 
  • All order types qualify for this promotion.  There is no limit to how many times participants can buy three packages of Designer Series Paper and get one free during this promotion. 
  • Specialty Designer Series Paper and Designer Series Paper Stacks do not qualify for this promotion and cannot be redeemed through this offer. 
  • Designer Series Paper purchased with Stampin’ Rewards or the Stampin’ Rewards 50%-off perk does not qualify for this promotion. 
  • Designer Series Paper purchased as part of a Starter Kit does not qualify for this promotion.


I also shared some templates with you to help jump start a few card ideas using DSP.

Have fun creating!  Mary


Wednesday, September 28, 2016

Cookie Cutter Christmas Part Two

Thank you for coming back by to see another two Christmas cards that I made using the Cookie Cutter Christmas stamp set, the Cookie Cutter Builder punch and the Candy Cane Lane Designer Paper!

Here are two more Christmas cards using the Crumb Cake Note cards.


I once again used the Candy Cane Lane Baker's Twine, Dazzling Diamond Glitter paper, Black Memento, Early Espresso, Crumb Cake and Real Red inks.  I used a Blender pen to color Santa in with.  Also used were Whister White and Real Red card stock and the Cable Knit embossing folder.

Friday I will share one more card, see you than.  Mary

Monday, September 26, 2016

Cookie Cutter Christmas

This coming week I'm going to share some cute Christmas cards that were made with the Cookie Cutter Christmas stamp set, the Cookie Cutter Builder punch and the Candy Cane Lane Designer Series paper.  I recently signed up for Ronda Wade's Online Creative Convention and I signed up for the Make & Takes that she provided the instructions for.  These cute little Christmas cards were made with Stampin' Up!'s Crumb Cake Note cards.  I had a lot of relaxing time making them too!  Today I will share two of the five that I made.


On the reindeer one, I added Wink of Stella to the antlers and some of the Candy Cane Lane Baker's Twine along with a rhinestone to the bow.  On the Teddy Bear one, I added a red bowtie and a rhinestone.  Inks used were Early Espresso, Crumb Cake and Real Red.  Card stock is Whisper White and Real Red.

Please come back Wednesday to see two more!  Mary

Friday, September 16, 2016

Paper Pumpkin October 2015

Happy, happy Friday to all of you!

Here is another Paper Pumpkin set that I made last week.  Everything is included with the kits and you can grab and go with your little red box!

For this kit, I just followed the directions and had some nice cards ready to share when I need them!!


The bottom one was shown to be stamped with "Congrats", but I decided to make those into thank you cards instead.

Now off to finish this garage sale!  Mary

Wednesday, September 14, 2016

Paper Pumpkin March 2016

Well, I'm behind on making my Paper Pumpkin kits, but you know what, when I made some cards using the March 2016 kit, it was fun to not really have to "think" about what to do and just create.  I do belong to a Facebook Group for Paper Pumpkin subscribers and I gleam a lot of neat ideas from there too!  Here are two cards that I made last week.  The first one was a example that came with the kit.


The second one, is one I found on the Facebook group, very simple, easy and should not require any extra postage either, WIN-WIN!!


You could easily make them into notecards too, if you didn't want a full-sized card.

Thanks and I'll see you again on Friday!  Mary


Tuesday, September 13, 2016

Clearance Rack Updated


The Clearance has been updated, lots of good things for sale now, only while supplies last.

Monday, September 12, 2016

Swirly Scribbles Snowman

Hello and good Monday morning to all of you!  I hope you had a wonderful week last week, I was busy pricing items for a upcoming garage sale, hope we can sell off some of our "treasures".

While surfing on Pinterest, I've seen many Snowman made with the Swirly Scribbles Thinlits, so I had to give it a try.  I did use some of my retired DSP, but you could stamp a background if you wanted too.  Thanks to whomever came up with this cute card.


I used the Snow Friends Framelits and Snow Place stamp set to add the details that make the scribbles look like a snowman!  I also used Thick Whisper White for the card base and ink colors are Real Red and Black Memento.  The carrot nose was just a hand-cut scrap of Pumpkin Pie card stock.

Very easy and simple to do, oh, I also used just tiny dots of Tombow Green Glue.  You can see it in the picture put I did put some Wink of Stella on all the swirls.

Thanks for coming to see me!  Mary


Thursday, September 8, 2016

Friday, September 2, 2016

Cookie Cutter Christmas, Take Two

Hello and I hope your week was a great one, mine was very busy, can't wait to get back into the craft room to play and relax.

Here is my second Christmas card that I made using the Cookie Cutter Christmas stamp set and Cookie Cutter Builder punch, which is now available!


As you can see, I remember to use my embossing folder.  This little guy came out so cute!  This time I color in the antlers and for the legs I used the Gingerbread Man for the reindeer legs.  I made a small bow with some Linen Thread and attached it with a Glue Dot.  The embossing folder is Lucky Stars, which is in the Annual Catalog.  Card stock I used was Very Vanilla for the card base, Real Red and Crumb Cake.  The DSP is retired from last year.  The inks I used where, Real Red, Early Espresso and Black Memento.  I used a Chalk Marker for the white part above the hooves.  I also added a few Basic Rhinestones.

Another fun card to make!  Mary

Thursday, September 1, 2016

Wednesday, August 31, 2016

Cookie Cutter Christmas

Well I'm off to a snail's pace in that I've started making my Christmas cards today!  Yes, I know, in August, Mary, PLEASE!!!  Well, last year I was making my cards in December and I don't like feeling rushed when I'm making them, that is because I don't make 30 of one card, I like to switch it up and use different stamps and punches.

The one I'm sharing today will be available starting September 1st, 2016 from the new Holiday Catalog.  This stamp set and punch are so darn cute and there are so many things you can use these cute images for, think cards, tags, treat decorations!

Here is my first try with this stamp set, Cookie Cutter Christmas and Cookie Cutter Builder Punch.


Now after I finished making this card, I realized that I had wanted to emboss the card front, but maybe I can do that the next time I make one!  The DSP behind the reindeer is retired because I'm trying to use up some of my older DSP before I buy any new.  

Card stock is Real Red, Very Vanilla and Crumb Cake
Ink is Real Red, Black Memento and Early Espresso
Sentiment is from the same stamp set

Well this is my share for today, come back Friday and see another Christmas card!!  Mary

Tuesday, August 30, 2016

Special Offer Starts September 1

Stampin' Up! will be offering Special Offers at different times during the coming year.  Here is the first one that will begin September 1 and run through September 7th.


Monday, August 29, 2016

Paper Pumpkin for August 2016

Over the week-end I received my Paper Pumpkin for August and as luck would have it, it had directions for a Thank You.  So since I needed to make a thank you card, it came in handy and I was done in about 15 minutes.  That is what I like about Paper Pumpkin, all of the supplies that are needed are in the kit and it is so handy, heck, you can take it anywhere you want to go!


There is a special going on right now with Paper Pumpkin too.  Here are the details.

Offer Dates: August 11–October 10, 2016
Offer Details: Use promo code “BOGO” at PaperPumpkin.com, make sure you select me as your demonstrator.  You will pay the regular price of $19.95 USD and you will get your second month for FREE! Use the promo code between now and September 10, you will pay full price for the September kit and get the October kit free. If you subscribe between September 11 and October 10, your first kit will be the October kit and you will get the November kit free.


Thanks for dropping in!  Mary


Friday, August 26, 2016

Halloween Matchbook Holders

The other day, these adorable matchbook holders popped up in my e-mail.  These cute matchbook holders where shared by Angie Pyjas, you can see her video tutorial HERE  On the inside of each matchbook is one little package of Tic Tac which you can find in the candy aisle at Wal-Mart.  Here is a picture of the bag, there are 50 little packages, each package has 4 Tic Tac inside and it cost right around $3.00, so it is a very good deal!!


I once again used the Spooky Fun along with the matching edgelits dies called Halloween Scenes.  I used Basic Black and Pumpkin Pie card stock along with the Halloween Nights DSP.  I also used Daffodil Delight, Pumpkin Pie inks along with Black Memento ink.  I use the 1-3/8" circle punch to punch out the moon with.  I used Tombow glue to secure the DSP onto the card stock.  Here they are closed.


Here is what they look like opened.


These would make cute co-worker gifts to leave on their desk!  

I hope you give these a try, they are so cute and fun to make too!!  Mary